
Testamos a CANETA 3D!
Do you know what just arrived? A 3D pen! It's a pen that works like a 3D printer. So, today let's see and explore this pen that I've wanted to test for years. Ah, let me tell you that we bought one of the cheapest ones they had, but I think it will work well. Look at this pen. It looks like a stove lighter. Let's find out how it works. First, it doesn't have A battery, it comes with a charger. So, we have to use this thing plugged in, which Is not very comfortable, right? Because it loses agility well, the pen stuck in The socket is limited. Back here, there's also a little hole where we put the filament, Which, in this case, is a plastic like the one we use in 3D printers. Look, these Filament here are from the 3D printer. It comes with a little bit inside the box, It doesn't even compare to these filament that we have in size, right? But I think We can already use it. And it is logical that inside the box comes the manual too, Which this time is in English, nice! And I also discovered that it has this little Pedestal, probably for you to rest your pen. It's to rest the pen on top because It's hot, right? Like glue, it needs some support. For those who have never heard Of this thing, it's a pen that releases plastic at the tip and then you can create Objects with this plastic that comes out. It is used in practically the same way As a 3D printer. This machine also releases plastic at the end, the difference is That it's all computerized, you put the design on the computer, plan it and such, Tell it to do it, she does it herself. We call this type of machine a CNC, it's From the same family as laser cutting, waterjet, ok? These are axes that you control using a computer. And of course there's nothing computer controlled here, you have to do it alone. So, it's much more like hot glue. Hot glue also releases a kind of plastic from the Tip, right? A kind of rubber. It also heats up the plastic to release it, this pen Will do that. The difference is that with hot glue you need to keep pressing for The plastic to come out. Not here. It will have a little motor that does it by Itself and a few more controls but I don't know exactly what they are. First thing, There are two types of plastic that we can use that the 3D printer also accepts, Okay? The first is ABS, it is a cheaper plastic. In a 3D printer, it's a little Tricky because the printer needs to be closed to use ABS, but it comes from petroleum. The second plastic is PLA which is made from plants. It can be made from corn,
Beets, cassava and even sugar cane. So the first control you have here is the temperature Of the pen. You put whether you are going to use PLA or ABS because they are plastics That melt at different temperatures. Let's work with PLA. So, let's put the filament Here and these two buttons, look, here comes the filament… Ah, it's coming out, It's coming out blue because there was already a blue one that we tested here before. In fact, it was Vitor who tested it, I hadn't seen this thing working. It's very Cool, it looks like it's pooping here at the end. So, this button here is to make The filament come out, there's another one to pull the filament back and, on the Other side, we have a button to increase or decrease the speed of that output. Let's try to use it at maximum speed. Look! Go slow, fast. Let's go! I'll try to make any object just as a test. Make the first object in my life with this pen. The first thing is we usually use on top of our plastic surface so you can remove It later so the plastic doesn't stick to the table. Here it also marks the temperature Of the filament. PLA is 210 degrees or so. I will try to make a cube. I had to have combined it with plastic before if it was going to stick to the table Or not. This is a problem that we have in 3D printers as well. If the plastic detaches From the base, the print is completely gone. Here, in this case, that's what happened. I started pulling on the plastic and it all came off. I'll try to do it on top Of a surface with sticky tape which I think is better. This square of mine is not Like that… Two problems, at the very beginning of the print, it came out all bubbled Because it was too hot, the plastic boiled. Afterwards, I went to make a curve, it Was still soft, it went off the curve and I took it out prematurely. So, it got more Crooked than it should have. Let's try to do it again. You have to understand the Pen speed and follow the pen. Anyone who works with soldering will probably find It quite easy to work with this thing here. You cannot stop in between. Oh boy! There's Been an evolution here, huh? Let's go further. I'm going to take a square and try To remove a leg from it in the third dimension. If this experiment works out, I think this pen has won my heart. Look what a crazy thing! Here is a junction already. Let's try to continue this story. The leg didn't stick. I'll try pasting after; that's another thing I haven't tested Yet. Welding a piece that is already ready. Looks like it happened, I'm going to do the last leg. How cool, look, I'm using the plastic as if it were a solder right now to glue the Parts together. Kind of has the function of hot glue right now.
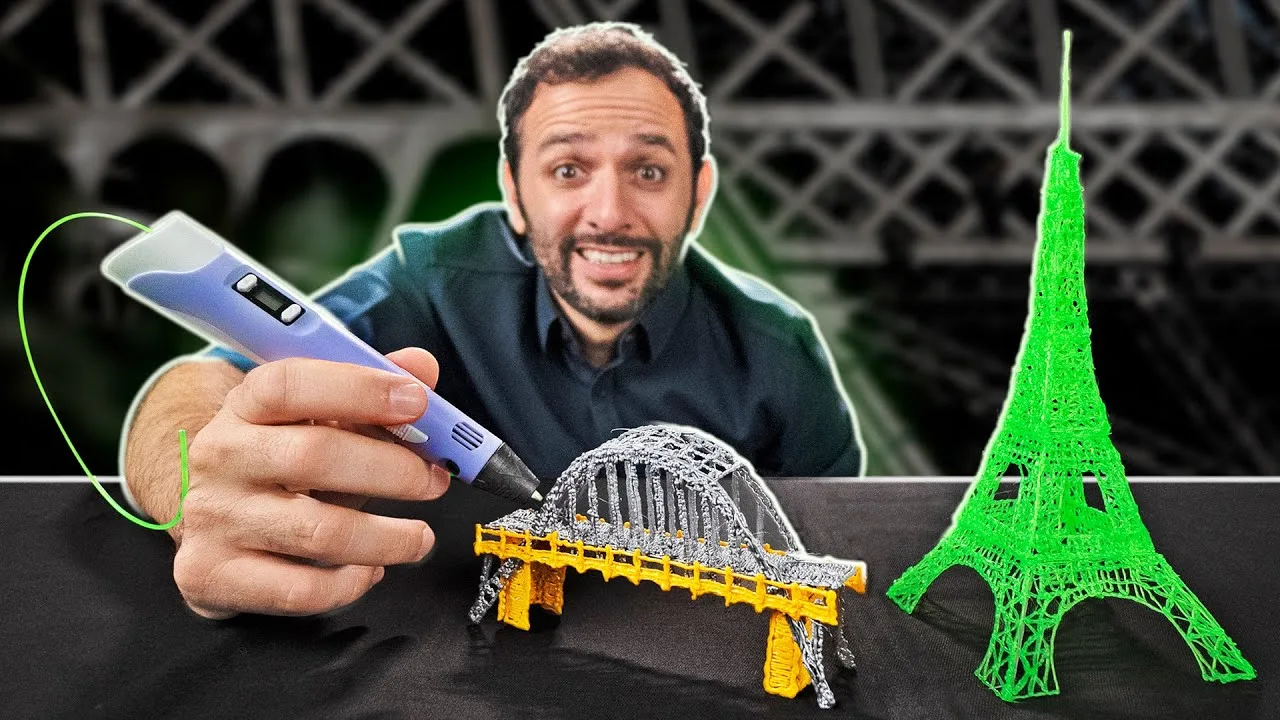
My first object made with the pen. I must say that I was surprised. I would already drop a thumbs up, right? But the Way people really play with it here is using drawing molds. So if you look on the internet, you will find several molds like this one where you Can create a 2D object that you then assemble, glue, etc., and it turns into 3D. I'm going to try with an easier one than what we chose here, which is a pair of Glasses, which are even a little more elaborate than the ones I wore at the beginning Of the video. You can even create your own drawing on the sheet and then draw over It with the pen because I think doing it directly with the 3D pen is kind of complicated. The ideal method is to plan ahead. I'm going to try using another filament color here, let's try a gray one. Beautiful isn't quite the word, is it? I'll try using a lower temperature and see if it gets less wrinkled. I hope you already gave a thumbs up on the cube part because now it's not going very well. A big advantage of 3D printers is this, check it out. It has a little fan that is right on top of the plastic coming out, so it comes out and it starts to harden. Not here. The plastic comes out, it becomes soft, you find it difficult to work with It. But I think these glasses are already cool, aren't they? Let's try to make this arch bridge now. There are 12 pieces, the challenge has nothing to do with glasses. And I also have my doubts as to whether it will look good. I don't know if I have the ability to keep doing little things as small as that. Now it's putting all this together… I don't know if it's making sense or not. Look, I'll admit that it's harder than I imagined. It takes a little practice here to make something look good, but if you look at the piece individually it's kind of ugly. When you look at it from afar, the whole set looks nice, it's not that weird. During all the work here, I have a doubt. Whether this thing is too hot and could burn our hands. Even because I think this is a really cool toy for kids to play at making things. But if you have the chance to burn your hand, maybe t's not for a child, right? You would have to be at least, I don't know, about 10 years old, I don't know. So, I'm going to do the test for you right now, let's see if this pen can burn you easily. If you squeeze the tip and keep your hand on it, you burn your hand. But if you Drop plastic on your hand, it doesn't burn. So, I think it's pretty cool, huh?
It releases some plastic filaments that also happen in 3D printers, okay? And when You pull it, a little bit comes together, then you have to remove it at the end. When you're doing it, you can't put much faith in it, no. But it turns out better than I imagined. There is something that is a classic make with 3D pens, which is making the Eiffel Tower. I think it takes a little more practice than I have done, because all I've Done is what you can see in the video. But let's take a chance. This paper that Is serving as a mold, you can reuse it later, okay? No need to throw it away. How About do we change filament? I'm going to use a lime green to make the tower just To have some different color. I take a piece that I need here, then, with the hot Pen, I press the little reverse button. I mean, it should… yeah, it wasn't warming Up yet… it's boring waiting for that. There's a smell of burnt plastic that stays In the air. I will tell you… Okay, it turned green, then I press reverse, the Filament comes out. And then put the next filament… and it's already cooled down. In that 10 second period that I turned it off, it has already cooled down. Now, I press here, and it starts to pull the filament. It was working with gray before, Gold, it started to come out green, it still comes out a little mixed… Now yes. When you are going to start using the plastic that is here at the end, it has already Been kind of cooking there, it comes out all charred. So, discard a little bit here and now. One interesting thing that the pen does is that when it stops releasing plastic, it Pulls back a little bit of plastic so that it doesn't dribble. 3D printers do that too. The problem is that when you press it again to release plastic, It takes a little while. So, the ideal method is to never stop releasing plastic Because when it comes back, it will always be more complicated. You don't think It's going to be perfect, but you don't think it's going to be that bad either. I'm going to try to use a little sticky tape here because I can't hold it in my hand. So let's glue it here. There are times when it doesn't stop coming out. I'll turn it off and on again. Worse, The temperature does not come back. I mean, it comes back, but it cools down and Then you have to let it heat up again. Now comes the fun part of assembling. I'm Going to put two bars in an x here in the middle of the foot of the tower, I think it's going to be soft. Much better. As the smaller the piece, it is harder to work with here, To fit this little ending now, it's not easy. Look, this tower turned out so cool that I'll leave it for last.
Let's do the same as with the perfect ball, I'll just show it at the end of the video. Now I'm going to give my verdict on this little thing here. It smells like burnt plastic, sticks, it's hard to learn, but it's reaaly cool! I would really like to win something like this as a gift, with a little bit of filament. I would have so much fun. If I was a kid, then, I would freak out about this thing. Just so you can have an idea, a pen like this costs $20 or $22. A 14 ounce roll Of filament costs $8. 7 ounces is enough for a lot. Everything we did here and… Let's weigh it, shall we? 1.3 ounces. So, you can play with it a lot. So, these were the objects that we managed to make like this on the first day of using A 3D pen, which cannot replace a 3D printer because it will not make things as well Finished, as complex, but it is a sensational toy. If you liked it, don't forget to give it that thumbs up, okay? I'm even going to remove that X-shaped reinforcement that I made that will look nicer To look inside because we don't need it, it's very resistant. If you felt a little lost in this 3D world, there's a video we recorded in the Manual Maker series showing how a 3D printer works from start to finish, with lots of details. It's worth knowing how this wonderful machine works.