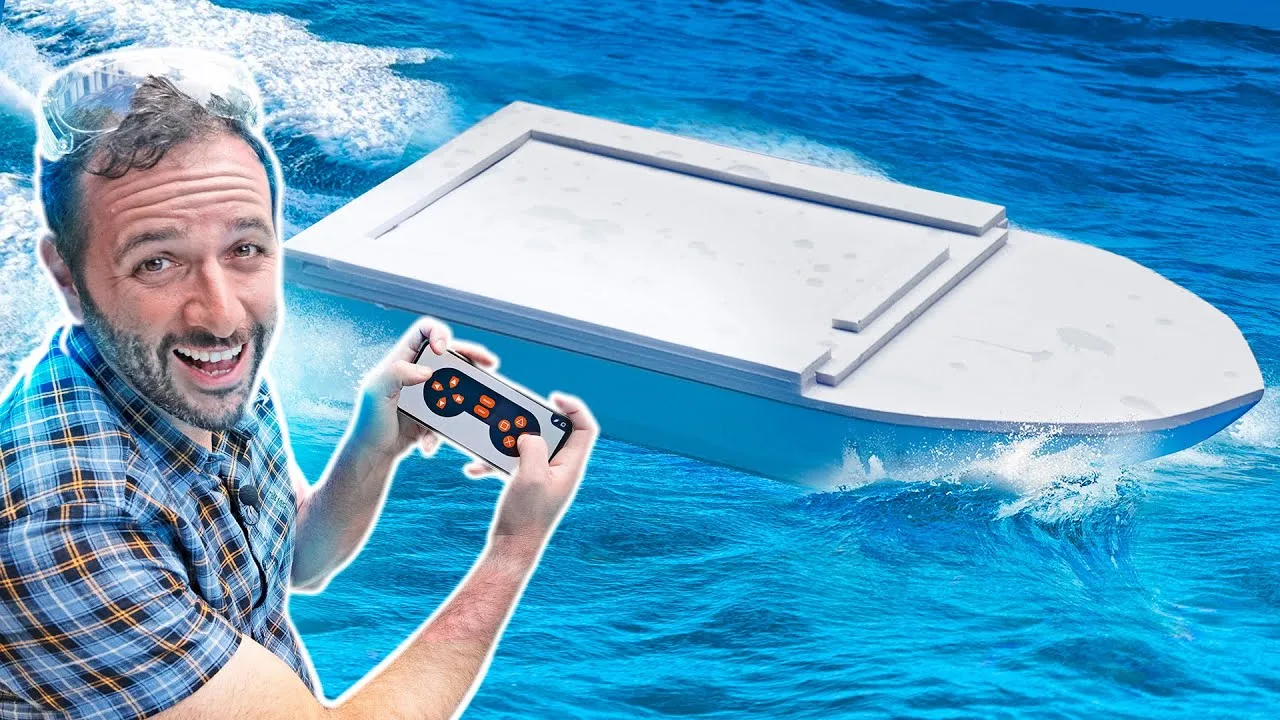
Como fazer BARCO CONTROLADO pelo CELULAR
Today, we're going to make a little boat controlled by the cell phone. You know that in order for Manual do Mundo to exist, people need to study every day. So, we are talking all the time with people who understand a lot, with specialists, Researching to bring you cool explanations that make you learn new things. And Alura also has a lot of classes and a lot of new things to teach. It is the largest technology school in Brazil with complete training for those who Want to make a career transition or deepen their knowledge. And what I think is Really cool about Alura is that you don't have to go in there and choose one course Or another. You pay per month and have access to all courses. It's like a streaming that you pay for and you can watch all the movies, but, in this Case, they are courses. So, if you need that little push to change careers, or want To deepen your knowledge, or want to learn new things like the people here at Manual Do Mundo, Alura is offering a 10% discount on all plans. Just sign up using the Link in the video description, ok? We made our little boat here in the simplest possible way. But we really wanted to have a boat model that you could make at home, but upgrade Later. Like, keep improving this boat more and more, because the last one we made Using a remote control cart and everything else is cool, it's easy to make, because You can find the cart anywhere, but you can't go much further than that with it. So, here's the thing, the boat's hull will be made of this foam paper… write it The way you're reading it down here. This drawing here you can download in the video Description, okay? The boat will have two 12 volt motors and two batteries as well. A pack of batteries will be used for the motors, and another battery will be used To power our Arduino. And it's precisely because of the Arduino that you can upgrade The boat, because you know that with the Arduino you change the programming and change The way the boat behaves. The Arduino cannot directly control the motors, so we need a small board to do this. Today, we are going to use a shield. So, the shield is a board that goes directly On top of the Arduino to avoid a lot of connections, otherwise we need a lot of wire Connecting this board to the Arduino. It's very simple here, you take and directly Fit the board on top of the Arduino and everything is fine. And one of the coolest Things about this boat is that its control is done by cell phone. So, we need something For the Arduino to communicate with the cell phone, we are going to use this bluetooth Module. And to propel the boat, we bought these two propellers here, and they are already made for remote control boats. The specification of all the equipment for you to buy is in the video description, okay? I'm going to use a few more things here, you can also do it yourself at home.
You might be a bit scared with this equipment here, but this here is much cheaper Than using those radio controls, because the control alone is already very expensive. Those fine lines you see here were made with a laser. We tried to cut it directly with the laser, but the problem is that there is a layer Of paper and a layer of foam. Paper is much harder to cut than foam, so when you Cut it you end up shooting a hole in the foam and it doesn't look nice. If you are Going to do it at home, just print the design then cut it by hand on top. You will Notice that the design is not perfect, we have to correct some things with a stylus while assembling the boat. But that's okay, the idea here is to have something at least hydrodynamic, that can Run well in the water and that doesn't sink. I'm going to put it all together with Hot glue, but you need to be extra careful. The glue can't be too hot, it can't Have balls coming out of it. So, first, you test the glue on a piece that's left Over there and see if it's not melting the foam. Any little hole you have here, I'll fill it with hot glue, something I couldn't do with any other type of glue, Even if you're going to use super glue here, you'll notice that it will melt the foam. It doesn't work. The beak part is the most annoying of all. It's very boring to hold this thing, like 3 minutes. Because we made a drawing here where you glue everything first and then you smooth The rest with the stylus until it's the shape you want. But you will notice that smoothing is not that difficult, we even tested sandpaper and it works. If you release the stiletto blade all the way, it is easy for you to follow the curvature Of the boat. It will float. But don't worry, the boat's lid is still missing, it won't open at the top. And besides the cover, on top of it, I need to make an opening, a kind of door so I can access the motors, the battery and everything else. So what I'm going to do here is kind of a wood case imitation. You know those covers that you pull, it looks like a sliding door? Like that. Let's Start doing the mechanical part of the thing now. The first thing I'm going to prepare Is the motor shaft, like turning the wire in the drill that you've already seen here In Manual do Mundo. Then I need a cover for it, and I'm going to do that by removing The cartrdige and the cap from a regular pen, then joining one pen with the other. So, in total, there are four pens forming two long tubes, they will have to cross The hull and come out at the back. I don't have a very nice way to make this hole Here. Use the pen. To couple this to the motor, I'm going to use these terminals,
This piece of sindal bar, which is normally used to join two copper wires together. Underneath the engine, I need some platform so that it is in the right raised position. We are using laser cut plywood here, but you can use the foam paper itself, no problem. An important thing here is that the water could enter through the pen, it will not Enter because the internal tip of the pen is at a point that is above the water level. Let's get to the electronic part of things. On top of the Arduino, we attach the Controller board, this whole shield here. Okay, it's connected. There are no wires, Everything is done through these terminals on the side. I'll leave all the programming That goes into the Arduino in the video description, so I won't be explaining a line Of code here. But there are some details that are good for us to know. First thing, This board will control the motors, it comes with a clamp here, with a Jumper that I need to remove. And that means that the board will work with a power that is not The Arduino one, I will put an external power on the board, it will send it to the Motors. Just so you don't lose anything, normally, we put the clamp back, but it Gets stuck in a single terminal. This means that it is no longer connecting one Leg to the other there, ok? The Bluetooth module needs to communicate with the Arduino, But now we have a board on top. So, I'm going to have to solder two jumpers here on ports two and three. I also need to draw energy to feed this board. I can do this with two Jumpers that also come out of the board here, but I don't need To solder that, there are these terminals here that I can fit the Jumper to. What You're seeing here are four connections that I need to make. The power for the motors Will come through these two connections on the controller board, and the energy for The Arduino will come through the 9-volt battery. This board holds up to four motors, But we will only use two. So I'm going to use the M1 and M4 connections on the board. If you are going to make and use our code, you already use the same connections. And, then, we have to make all this fit inside the boat, which is not a very easy Task because the jumpers are kind of short, the Arduino cannot touch close to the Axis, if we put a wire passing close to the axis, it can also get tangled … anyway, It's a puzzle that we have to solve to be at least a bit sensible here. Beautiful We already know it won't be… Now comes the cool part! Look, there's a little Program called Dabble that we install on our cell phones, and it manages to communicate With the Arduino via Bluetooth. So, I come here on the cell phone, connect the Arduino And I can already control what is here. We've already made a code that understands Buttons and makes it so that, when I press the button, it turns on the little boat.
We programmed it in a way so that here if I press forward, both motors are on at The same time. If I want to turn left, only the engine on the right is turned on, We don't need a rudder. Just like the submarine, to the left it's the same thing. You start the engine from the other side. It also has reverse and, then, just turn The two engines in reverse. It also has a maneuver option. Squeezing the little Ball or square, we make the engine go forward and the other one backwards, then the Boat sort of turns over its axis. There is only one detail that I noticed, which Is that the motors are turning in reverse. And this is quite simple to solve electrically, We just reverse the polarity of the motor, swap the positive and negative wires here. There's no problem doing that, the only thing is that the engine turns backwards. But that's exactly what we want to do. Shall we go to the pool? Let's check if water isn't getting in first of all. Otherwise, The plate will get wet here. Okay, water is coming in. Look at the water over there. It was all so beautiful. I'll confess to you that I was so worried about the electronics That I didn't care much if this boat was 100% sealed. Just because it is made of Foam, so it is impossible for it to sink. But it is possible for water to get inside, And if a little water gets inside for the board to be turned on, you can imagine What will happen, right? It will burn the Arduino, the controller board and everything Else, and we will lose all our work. Now I'm going to put it open in the water, If something gets in, I can already see where it's getting in. Look, the water rises A little through the pen here, but it doesn't reach the end. Looks like no water Got in, let's connect the batteries, close it and let it run. Look what a beautiful thing! Look at the movement it does. 360. Let's check there's no water inside… A drop of water got inside the pen, probably When we reversed. Because then the water goes in the direction of the pen, right? So, we have to back up slowly. Wow, this is really cool! It's super quiet. If this isn't worth a thumbs up, I don't know what's worth a thumbs up. I think that our main goal, which was to create a boat prototype that worked well, Worked beautifully, but which from there descends to create something even cooler, worked really well. But this here deserves a boost in the next video, huh? Look, we had just finished Recording the little boat, we went to record this helicopter, a final take here, We're doing some crazy things with it. In the end it fell into the water. Since It is not very much alive, we could do a transplant because this one has two engines
And most likely the engines on this boat, or this helicopter, are stronger than what we put on the boat. Let's disassemble this helicopter. There's not much to save here. What I really Want are the two main engines. The first thing I'm going to do with them is make The wire a little longer, because here in my little box I need to make the end of the wire reach the controller board. Afterwards, we will remove the original engines from the boat and this cannot be done With great care, you will notice that it damages the boat a little from the inside. These supports here are very well glued and, to remove the support engine, we have To break the support itself. Then, all we have to do is attach the motors to the Shaft, there's not much of a secret here, because the shaft is the same size. Then I position the support, the little motor was a little higher, so you have to fill The missing space with hot glue. And then just plug everything back in. Another Advantage is that I can now use a much smaller battery. The engine is replaced. Let's see if it works. Connected. No sign. It's not holding up. Look. I don't think the board is handling the motors. If I connect the battery directly to the engine, look at that. And when I put it on the board, nothing happens. But what if I connected the helicopter sign directly to the boat? I cut the connections here… Where's the other one now? It's here! Theoretically, it's working. Not that I have much control over what's going on, but it's going to be fun. This Is going to be really cool! It's a bit messy. In fact, I'm not going to close this Here because I think it's better to leave it open. Uow! But I don't have individual control of the engines now, it goes forward. The engine escaped. Water fell, and the engine escaped… It's too hot. Have you stopped? I think this helicopter had an end in store for it. I'm going to leave here at the end our list of boats from the Manual do Mundo, not Only the big boats, but we've already built a miniature sailboat, we've already built Another remote control boat, well, there's even a boat in a bottle!