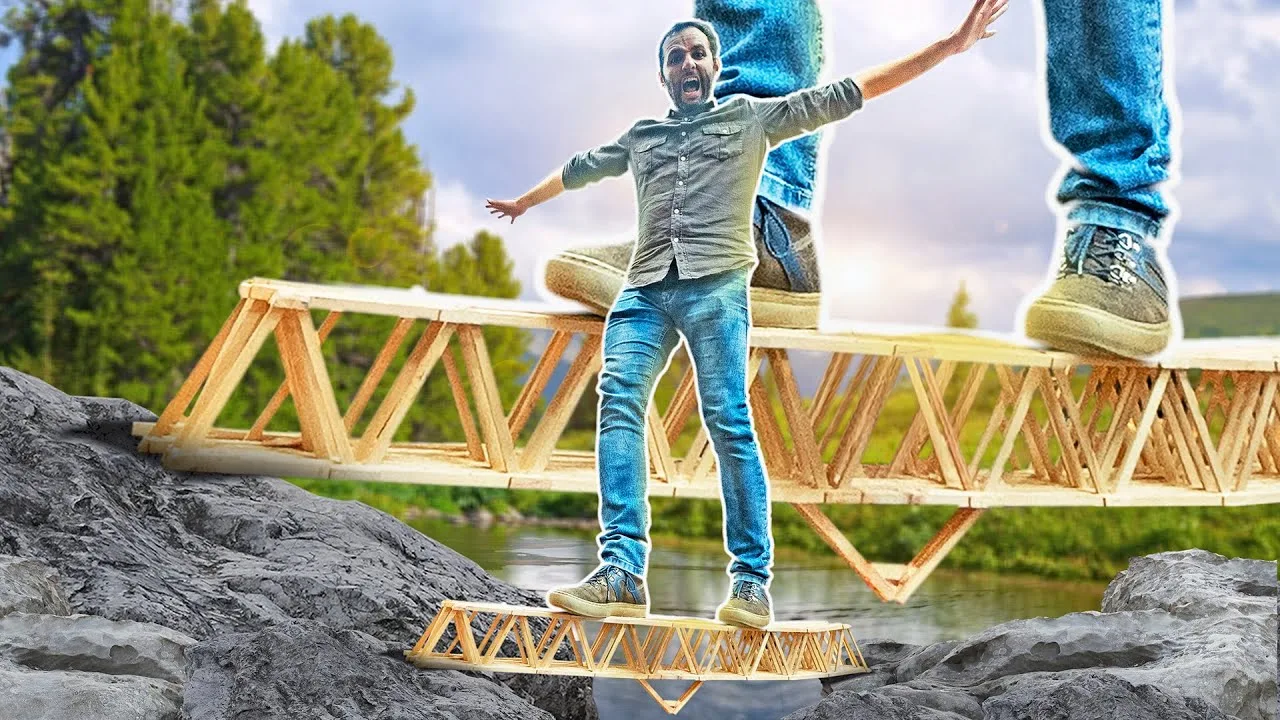
Andei na PONTE de PALITOS!
The time has come for us to build our bridge. There are championships all over the world building stick bridges, but who knows, maybe we can beat a world record. We did a lot of research and found that each place has a different rule for making a stick bridge. So, here's the thing, we're going to establish our own rules and they're going to be as simple as possible. First, we can only use ice cream sticks and glue. Any type of stick with any type of glue. Second, the bridge, once ready with the glue dry, can weigh a maximum of 1 kg. Third rule is that the gap, the hole that will be under the bridge, is 1 m long. And Fourth, that for us to test how much the bridge can hold, we will hang the weight Exactly in the center of the bridge. Now, how wide will the bridge be, what shape Will it be, what kind of ice cream stick will you use… whatever. You can do it Any way you want. We bought these pine sticks that have a straight tip that is easier To work with, it cost R$ 30 per 1000 sticks. Just so you can have an idea of the Weight, 1.2 kg per thousand sticks. So, you can easily build the bridge with these Sticks plus the glue. Here we are going to use white glue for wood, and this one Is a good quality one, it costs R$ 25 for half a kilo. We tested superglue, it would Be really cool to work with it because it dries very quickly, but it breaks easily. This one, if you wait for it to dry, is much more resistant because it is elastic And sticks really well. But we have to press one stick very well on the other when Gluing. So, I have these clamps here, but there aren't many, you can see they're crow's beak clamps. So, we need to make more of these clamps, but we're going to do it with PVC pipe. Just cut some strips and rip it open so it looks like a pac man. Everything I've talked about so far is super easy. The question is what shape are we going to make the bridge to make it as resistant as possible? I have no idea. To find out, we're going to keep a logbook and write down the results of all the tests. This is important in any experiment you are going to do because the next day you no Longer remember the things you weighed, the things you measured, etc. We are building knowledge. When I go to make the second bridge, I already know a lot of things that I didn't know in the first. Oh, the test of time. Half an hour of gluing time and it's already well glued. I think at this point we don't need the clip anymore. One hour of gluing time.
It's already very well glued, it's coming loose at the edges. It came off now that I forced it a lot, but it already ripped a piece of wood with it, look. Test done, We know how much time we need before taking the clamps off. So, let's glue and prepare the first resistance tests of the structures. How many kilos can a beam like that hold? I'm not going to do the tests with a meter because it's too much work. Let's do the tests with 60 cm and a gap of 50 m, which is half of what we put in the Rules. The first test that we are going to do is the resistance of the upright stick Beam against the lying stick beam. With a stick lying down, it couldn't even handle The bucket that weighed half a kilo. And standing up, it held 900 grams. So, we Already know how you are going to use the sticks. The second test I want to see If it makes any difference to put these reinforcements in the splices of the sticks. And, amazingly enough, it made a huge difference. This time, it held 2.5 kg. And, Finally, could it be that if we use three sticks, it will hold much longer? It held 3.2 kg, which is more weight than the previous test. On the other hand, the beam Is also heavier. Considering this, it is better to place reinforcement than to use Three sticks. In this second stage of the tests, I will always use a structure that Is four sticks wide, but their arrangement is a little different. In this one, we took advantage of the reinforcement between the sticks to be their spacer at the same time. This other one is a kind of ladder, so to join the two rows of sticks, I used a kind Of an H. It has two sticks horizontally and one vertically inside. This one is the one I'm rooting for, there are four sticks and the joints are in the same place. This means that there will be space left over here for us to connect other things. All of them are an evolution of the structure that we found to be stronger in the Last test. Let's see how much it will hold now. 1 kg, 2.5 kg counting the bucket weight. I'm going to put another half kilo here. Let's go in increments of 200 grams. 3.7 kg, 3.9 kg… 3.7 kg. 3 kg. 3.4kg. What we are taking into account here is not how much a structure can withstand, it Is how much it can withstand in relation to its weight. It's no use for a structure To support 100 kg and it weighs 200 kg. I need a lightweight structure that can withstand a lot of weight. And the one that I most wanted to make it work was the one that withstood less proportionately. So, we go with the first option. Now the following, you saw that in the tests, When I add weight, the bridge forms a kind of U. It opens its beak downwards, it descends in the middle.
I have to create some structure up here that prevents that from happening. So I have to create some kind of triangle. Look, how cool is that, now it doesn't form a U any more. It's stuck. Why is it stuck? The moment this ball tries to come down, it's going to pull on these two springs here. When these two springs are pulled, they tend to close. But this one won't let it because it's being compressed. And at the same time, these Two here are also pulled. All this structure on top prevents this little ball from Going down. Look what happens if I remove, for example, this here. Right away, the balls come down. Or if I take this one. You understand the power of triangles, huh? But there is a complication in this story. This is the simplest structure I can create in this logic. I can do this here in a longer way and I can do it here in a curved way on top. I'll Have to test to see which one works best for us. The first one is going to be an M very similar to the one I made on the bridge. It's basically three triangles. The middle one upside down, and we have two triangles on the sides. But I also want to make a truss. There are several tiny triangles next to each other. The bridge becomes lower, but theoretically you have more triangles. And the third shape is an arc. The tendency now is for this to hold much more weight. And I'm rooting for this shape because it's the simplest, it's the one that takes Less work and we've seen several photos of bridges in this shape that can withstand A lot of things. Let's go! 5 kg. 6 kg. 6.5 kg. The tendency now is for this to hold much more weight. And I'm rooting for this shape because it's the simplest, it's the one that takes The least amount of work, and we've seen several photos of bridges in this shape That can withstand a lot of things. Look how interesting. It broke two points of the triangles here. Ah, this one is super strong too, but… not really. It won't hold. Look! Oh, if I straightened this out here… 9kg, 10 kg. Oops! There's already been a much higher resistance index here. 11 kg.
It never breaks. That alone has 770 grams. 1.160 kg. Oh boy! It dropped several points at once, but it didn't break in the middle. I have no idea How much weight it had here, I just know that the last one doesn't count, right? Because it broke out with the last one. But let's do the sum now. Look at the list. Look, I'm going to say that I was very confident in this structure, which is the same As what we did in the spring, except that it started to bend when we increased the weight, it broke. The arched one was the same thing. But the structure we made with a bunch of triangles next to each other, kind of latticework, Held up a lot. 344 times its own weight. This structure supported 28 kg. Our bridge will be very strong. I think we have a winner and we also have a lot of work ahead of us. Now it's building the right size. For a gap of 1 m, our bridge has to be 1.10 m to be 5 cm on each side, this will serve as support. It took several days gluing, sticking… There was some time left for someone on The team, that person would go there and glue ice cream sticks. And one annoying Thing is waiting for the glue to dry, because if we remove the clamps too soon, the Sticks will open up and lose resistance. One thing I discovered this morning, when I went to weigh the structures we made yesterday, Is that the structure becomes much lighter overnight because the glue dries. This here, for you to have an idea, "lost" 10 grams. As we were going to use five, There was a difference of 50 grams. This means that it opens up space for us to Use another structure like this. Of course, this is very good, because the bridge Will be stronger, but it will take a lot more work. To put all these structures Together, first we put them in pairs, then we put two pairs together, making four, And, finally, we put the last pair and waited 24 hours to remove all these clamps and clips. Our bridge is practically ready! What a beautiful thing! Now the next thing is, we have to weigh this bridge and see if it is ok. I want to take advantage of every last gram here, so let's add some reinforcements Until we get to 999.999 grams. So, let's reinforce this middle part where the weight Goes. I really wanted to make a much bigger triangle, but we have very few grams
Of margin here. That's right, you have to put some locks here on the corner of the Triangle and that prevents the triangle from opening. And now, yes, exact weight. On the stem, that's because this glue is still going to dry, I'll probably gain One or two grams by tomorrow, maybe a little more. We looked for a lot of weights Here in the Manual do Mundo, but as we are optimistic, there wasn't enough weight to put on the bridge. So, we asked Professor Kleber, from CrossFit Osasco, for help, where he has a lot Of weight to test this bridge in a slightly more… strong environment. They go from 1 meter, and we're going to put a bar up here. This will be the point Where the weight will be made, and, down here, we'll hang the weight from two strings. 5.220 kg. We can count 5 kg on the platform alone. And to attach it to the bridge, We're going to use a barbell that weighs 10 kg. But that barbell was a bad idea. As it's big, it gets wobbly and it's super dangerous if it falls on top of me while I'm putting weight on the platform. So, we replaced it with a hand weight that has The same weight as the barbell, only much smaller and safer. We zeroed the count, So we're starting over. It weighs 10 kg plus support, Felipe. Wait, so, 5.260 kg For the support? So this right here goes to 30.226. Oh, it's much more stable, it's much more stable. Shall we put the weight on the tip? Another 40 kg. How much? 75.226 kg. If I add this 4.5 kg here, it's practically my weight. Another 4.54 kg. One more. I weigh 81.5 kg. I think I'll go up on top of that bridge, huh? How much? Plus 4.54. Another. Another 4.54 kg. 97 kg? I think I can climb it. Oh my God. No no no no. Wow, if I fall, I'll have to make a big jump, right? No, I'm not going to go up there, no. If I fall, I'm out of here. No, I think it's worth taking off a box. I'm going to decrease the height here.
Can you take it off and I'll hold the bridge? Now… Now yes. Now if I fall, I won't come off too badly. That little climb didn't do much good for the bridge, okay? There's a stick here that came off and a joint here that also came off. Maybe I've Damaged the resistance a little bit, but come on, let's put the scheme together again. It's giving in, but it stopped making noise. 97 kg. I think it was worth the thumbs up, right? Look, it dropped the glue here. The tip of all sticks has escaped from the main bridge. And look, we used a good glue, pressed it, waited a long time to dry, but there's no magic, right? If I hadn't gone up, it would have held another 20 kg, I think. Me unbalancing myself On top that messed up the bridge. But it supported, practically, one hundred times The weight of the bridge itself over a gap of 1 meter. It's quite a thing. Kleber, thanks for the strength. I hope that on the next bridge, we will get around 200 kg. Then we'll see if I get up too. If you watched until the end, it's because you like powerful structures. Perhaps The most powerful one we have ever visited is Itaipu. It's a video that took us Two days to record, but I'm sure it's one of the best in Manual do Mundo. If you haven't seen it yet, it's worth a click.