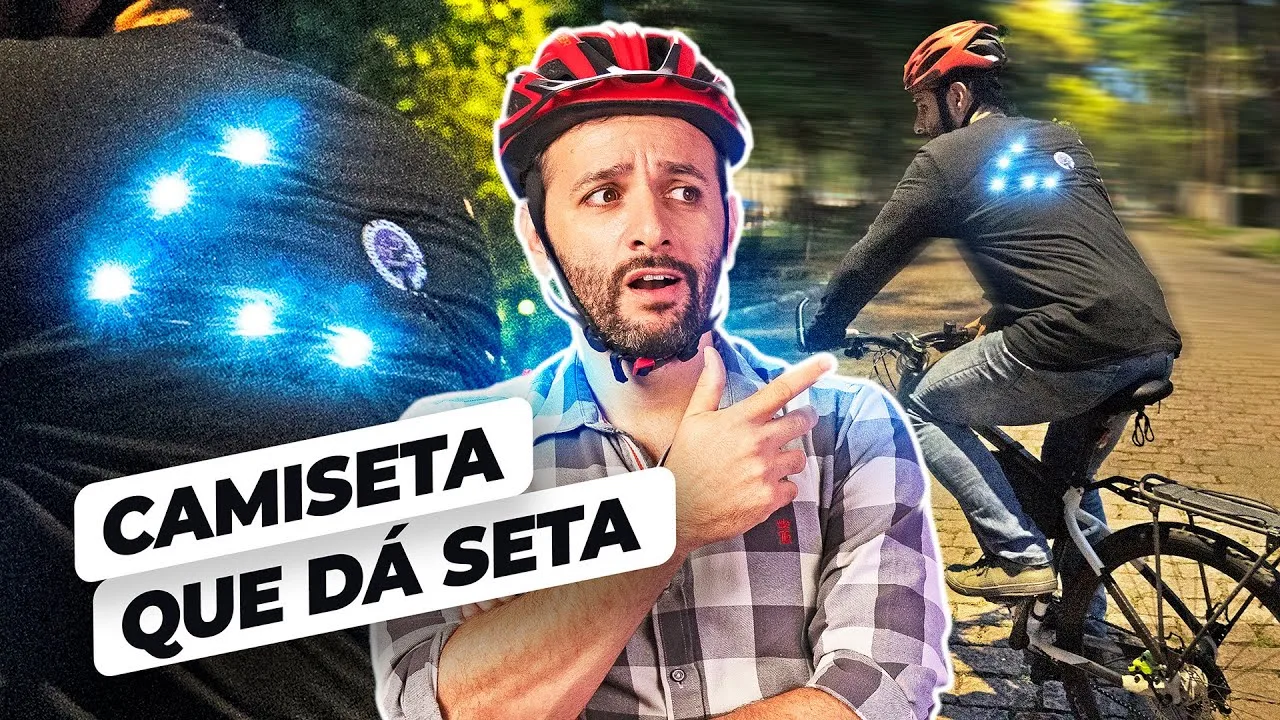
CAMISETA INTELIGENTE que DÁ SETA: Faça em casa!
Today I'll show you how to make a smart t-shirt that turns on the signal for you to ride a bike. This type of technology that we can wear, put on the body, is called wearables. So maybe. You think this is a super new thing, because today we have a smartwatch, virtual reality Glasses, super headphones, LED mask, like Lady Gaga… But don't worry, this idea of wearable technology is much older than you might think. And every time the subject is technology, Petrobras is with us, which is a leader In technology and innovation in Brazil. And this one is another episode of our SuperTech Series, where we dive into some super technology that will change the world. And when do you think this thing about wearing technology came about, huh? 1980s, 1950s? 1920? It's very likely that you have some super futuristic outfit in Your head that says how much it hurts when we talk about waerables… but it could Be something much simpler, like a wristwatch. Maybe not this one, but… this one. But what is the date anyway? It's much earlier than we think. We have records of waerables going back at least 1571 when Queen Elizabeth I of England Won what was perhaps the first wristwatch. Well, it wasn't Santos Dumont who invented The wristwatch. He was just, like, an influencer who popularized the wristwatch. And not only that, it even had an abacus ring from 1700, Chinese from the Qing dynasty. And who knows what people used before that, I don't know, a helmet with a sail… this story should go far. But let's agree that it is logical that these wearables were latte close to what we Are starting to see now, like this little watch that I have on my wrist here, it Can measure steps, measure how many calories I burned during the day, measures the Oxygenation, it tells me where I am, it measures my heartbeat and, of course, I can even look at the time on it… But this watch is nothing compared to the wearables that Petrobras is implementing On a daily basis, like the augmented reality glasses that mix our world with the virtual world. Just like those super tech glasses from Tony Stark. So, imagine that a person enters the environment full of ducts passing by, records, Such that complex thing that we saw when we made the video of the platform and, with Glasses, they can see what is happening inside the duct, they can get information About each record of that, what it works for, how adjusted it is… it's like we Look at all that and, suddenly, we can see and understand how everything is working. It's like we augment reality.
And that's why it's called augmented reality. So, let's go to our clothes that we Are going to build today. It is a little simpler, but has the advantage that you Can do it at home. I'll let you know that we're going to build a prototype, okay? It's not a 100% finished product, so you can invent things around it later. And, Today, I'm going to use a piece that I've been wanting for a long time, which is this. This here is the Arduino Lilypad, it's an Arduino made especially for you to wear. An Arduino for wearables. Look at the difference for the Arduino Uno. You can See that everything is made for clothes, flatter, smaller, you can sew using these Holes, you can even tie a conductive thread and it also uses less energy. To power The Arduino, we're going to use this 3.7 volt battery, which is the same one used In those card machines. And we also bought three other components that are specific To wearables and you can use them on Arduino. Look how cool, there's this LED that Already comes with a resistor, you can sew it on clothes, there's this button that Looks like an LED that is also sewable and a sewing thread that conducts electricity. The idea is for us to have a long-sleeved shirt that has two sets of LEDs on the back, Which indicate where you are going. For you to activate this, to turn on these LEDs, We have a button on the right side, a button on the left side. There's also an LED That lights up on the left and right sides so that the cyclist knows if it's working, Right? Same on the motorcycle. When you turn on the signal, there's a little thing Blinking there letting you know that the signal is being given. And we would have Here in the middle the Arduino that controls everything and, in some corner, I need To put the battery. I'm doing a seam here, but, thinking electrically, it's exactly The same thing as passing a thread, with the difference that there's no soldering And I have to be very careful that one thread doesn't touch the other. The big advantage Is that it won't solder. The downside is that you have to tie it very well and, If I make a mistake, it's bad to do it again later, huh? The seam is basically this one. You can't go to São Paulo Fashion Week like that, but at least the electric part, I think it's right. It's missing two things. We need to install the buttons here at the end and the LED as well, but then I have To put the clothes on to know exactly where it goes. I look like a puppet, you know, with those strings hanging down… Let's go, the idea is this, I want to put the button here on the side of my hand, So I'm going to make a hole here in the shirt so that I can sew the button here and tighten it with my thumb.
This little button that we bought here is not good to press, no. If I put it here In my hand, I won't be able to squeeze it, look. There's no catch. I already know How I'm going to solve this. We made a workaround here to replace that wearable Button that is full of things, but doesn't work properly, with a tactile key that Is this super simple little square button. It was welded onto a universal plate and, thus, we can sew this plate directly onto the shirt. Let's finish. Now yes, the little button is clickable. This LED is what will let me know if the Signal is working, it will flash along with the sign on the back. It's clearly visible, there's no doubt about it. I had finished sewing, I went to see if it was making contact, the little knot I made In the thread escaped. Now it's chipped. I don't have the slightest idea what to Do. I'm going to tie a knot again here, but I'm going to apply some super glue. Super glue isn't very good because it removes the contact, but I'm going to believe That, in the middle of the knot, the contact will remain. Let's hope it's true. All that remains is to install the battery, and I didn't want to do that with this Conductive line, because I don't think it can carry much electricity, many amps, so I'm going to do this part with wire. First thing I'm going to do is make the wire longer, it doesn't reach, I don't want To leave the battery right in the middle of my back, so I'm going to graft two little Pieces of wire here and solder it in the middle. Then, I have to pass this little pair of threads through the inside and make a few Stitches so that they are glued to the fabric. And finally, I still have to sew a little bag to put the battery inside. It's time to put the code on the Arduino and then we have a bit of a complicated detail here. You can see that it doesn't have any USB connection on it. I had two options. One Was to buy an adapter, so I would have a USB connection to plug into my computer. And the other is to use an Arduino Uno as a bridge. I connect the Lilypad to the Arduino Uno, and the Arduino Uno to the computer. As we already have the Arduino Uno here, let's do this. First step is to take the brain out of the Arduino Uno. It's going to be kind of a zombie, and then I need to connect five wires going out Of the Lilypad and into the Arduino. We made this drawing here to make your life Easier if you are going to do it, okay? The name of each of these connections is Where you have to connect it to the Arduino. And now, just connect the Arduino Uno to the computer. And here on the computer is what we always do on the Arduino. We take the code we wrote and inject it into the Arduino brain using a little program
Called Arduino IDE. When choosing the board here in the program, I have to say that I'm using the Arduino Uno, okay? There's nothing Lilypad here, it's thinking it's connecting to Uno. Here in the programmer, I have to put this here, okay? AVRISP mkii. And now just Come here and give a Sketch, upload it and it already uploads the code to the Arduino. There's just one really nice detail here. This code that we are uploading was created By Artificial Intelligence. We entered ChatGPT, which you already saw in that video Where we answered a test using Artificial Intelligence, and asked him to make the Code for this here, explained what we wanted, and he generated the entire code. At The beginning of the code, we put a few more comments explaining how to connect an Arduino to the other and everything, but the program itself was made by the machine, Not by us. All the images that you saw in that video that we showed the queen wearing A watch, the abacus in the ring, all that was also generated by Artificial Intelligence. We used Midjourney, which is one of the programs that we've also shown here that manages To generate images using Artificial Intelligence and it's a really cool way for us To imagine what something that we don't have access to or that we don't you can use The photo in the video. We haven't tested the code yet. Time for butterflies in The stomach, that time when everything goes wrong. So theoretically, if I press The button, the signal starts blinking. That's what I want, when I press the button Again, it stops blinking. Control is that simple. One, two, three and… Ah, what a beautiful little thing! Turned on the signal! Come on, I pressed again… Come on, I pressed it again… and it didn't stop blinking. Let's complain here on ChatGPT and ask for the button to turn off after we press it. The button is not working well, sometimes it turns on, sometimes it does not turn off…. We start form the beginning, I had it all done again. For the third, fourth, who knows which time… This part we already know. Right? Now the issue is when I press it again it has to stop. Shall we see the other side? It's working.. Now, I press again, it has to stop! It worked out! Fancy this helmet with camera on the top. Just getting on the bike, I already noticed a little problem here. I put the switch Right where I touch the handlebars. So, look, it calls without me noticing. Another Thing that could be improved is making a bigger T-shirt, because when I reach out To pick up the bike, I already feel the wires touching my skin.
Some things I've already noticed that are really cool. First, it gives you a lot of security to walk on the street with this crazy thing here. You realize that the car behind you is seeing you, this is very important. I also noticed that, as I sweat, there is a kind of bad contact in these lines. So, it would be nicer to have some protection inside so the line doesn't touch my skin. Another cool thing is that this here worked really well. I would never be able to see the signal on my back, so this little light is essential for me to know if it's working or not. If a shirt like that isn't worth a thumbs up, I don't know what's worth a thumbs up. Want to learn more about technology? In the last episode of SuperTech, we showed the secret path that your files take on the internet. I'm sure you won't imagine where you're traveling at the moment you browse. Sponsored by Petrobras.


